2017.12.29 - posted in security
The other day, I was in the process of moving my blog to Pelican, a static site generator. Browsing for some themes I stumbled upon Pelican Alchemy, which led me to the site of the Nairobi GNU/Linux Users Group, where I found some nice blog posts.
One in particular caught my eye and I intend to investigate it later this weekend: Using systemd Timers to Renew Let’s Encrypt Certificates.
Looks nice, and very useful for my webserver on which I have a bunch of Let’s Encrypt certificates installed. Automating the renewal sounds appealing and it was already on my list of ‘things to look into’.
2017.08.15 - posted in macOS
I was still using KeePassX 0.4.4 on my Mac. This version doesn’t support the Retina display on my Mac, but it wasn’t annoying enough to upgrade/migrate. One of my colleagues mentioned KeePassXC (https://keepassxc.org/), so I decided to give it a test drive.
Be sure to download the digest file as well and compare the digest against:
cat KeePassXC-2.2.0.dmg.DIGEST && shasum -a 256 KeePassXC-2.2.0.dmg
The result should be the same:
d5dec4a01b0fa00f36ebbd8d001ad24a1559d7f897af3d9a2fbdb339b02086bc  KeePassXC-2.2.0.dmg
d5dec4a01b0fa00f36ebbd8d001ad24a1559d7f897af3d9a2fbdb339b02086bc  KeePassXC-2.2.0.dmg
2017.01.28 - posted in Ubiquiti
To secure your Ubiquiti user account, you can add your ssh key to the account.
Assuming your on Linux or macOS, these are the steps (make sure you use the IP address of your EdgeRouter):
On your system
cd ~/.ssh
scp ~/.ssh/id_rsa.pub 192.168.1.1:/tmp
On your EdgeRouter
configure
loadkey admin /home/admin/id_rsa.pub
commit
save
exit
Unfortunately, this gave me:
Not a valid key file format (see man sshd) at /opt/vyatta/sbin/vyatta-load-user-key.pl line 96, <$in> line 1.
The solution is to take the key part out of your id_rsa.pub file en specify the key and the key type both in the configuration tree.
configure
set system login user admin authentication public-keys user@host key ***KEY-BODY-HERE***
set system login user admin authentication public-keys user@host type ssh-rsa
set service ssh disable-password-authentication
commit
save
exit
2016.09.23 - posted in security
The report
Recently I decided to enable SSL for my blog. Of course, I checked the quality of my SSL settings, which weren’t too bad, but not A+ either:
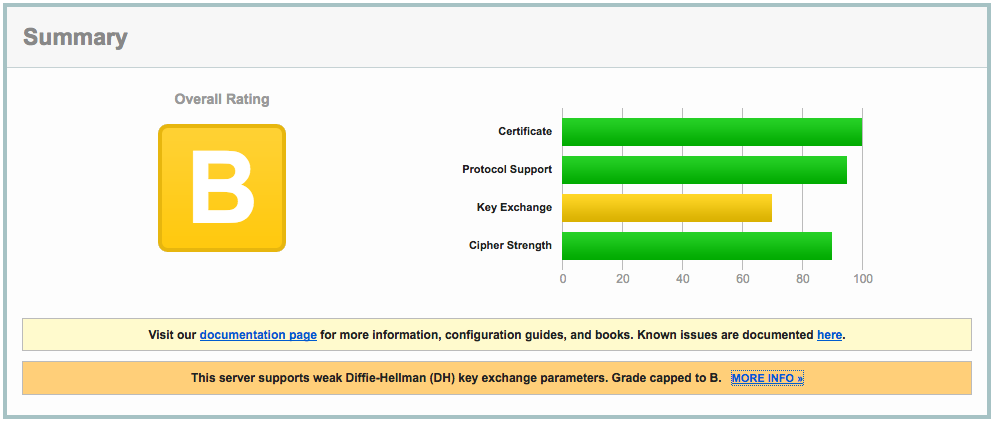
The clue is in the report:
This server supports weak Diffie-Hellman (DH) key exchange parameters. Grade capped to B.
The cause
The problem is explained in detail at https://weakdh.org. What it boils down to is that by default, a Diffie-Helman group of 1024 bits is generated, which is considered weak by today’s standards.
This is the main reason for the ‘B’ grade. Other SSL configuration parameters are important as well, so read on :)
The solution
Here’s how I remediated this problem. First, I created a 4096 bit DH group:
openssl dhparam -out /etc/ssl/certs/dhparams.pem 4096
The output would be something like:
Generating DH parameters, 4096 bit long safe prime, generator 2
This is going to take a long time
........................................................................................................................
<snip>
.........+.............................................................................................................++*++*
After generating the 4096 bit DH group, I changed the following parameters in the server block of my nginx vhost config:
server {

    ...

    ssl_ciphers 'ECDHE-RSA-AES128-GCM-SHA256:ECDHE-ECDSA-AES128-GCM-SHA256:ECDHE-RSA-AES256-GCM-SHA384:ECDHE-ECDSA-AES256-GCM-SHA384:DHE-RSA-AES128-GCM-SHA256:DHE-DSS-AES128-GCM-SHA256:kEDH+AESGCM:ECDHE-RSA-AES128-SHA256:ECDHE-ECDSA-AES128-SHA256:ECDHE-RSA-AES128-SHA:ECDHE-ECDSA-AES128-SHA:ECDHE-RSA-AES256-SHA384:ECDHE-ECDSA-AES256-SHA384:ECDHE-RSA-AES256-SHA:ECDHE-ECDSA-AES256-SHA:DHE-RSA-AES128-SHA256:DHE-RSA-AES128-SHA:DHE-DSS-AES128-SHA256:DHE-RSA-AES256-SHA256:DHE-DSS-AES256-SHA:DHE-RSA-AES256-SHA:AES128-GCM-SHA256:AES256-GCM-SHA384:AES128-SHA256:AES256-SHA256:AES128-SHA:AES256-SHA:AES:CAMELLIA:DES-CBC3-SHA:!aNULL:!eNULL:!EXPORT:!DES:!RC4:!MD5:!PSK:!aECDH:!EDH-DSS-DES-CBC3-SHA:!EDH-RSA-DES-CBC3-SHA:!KRB5-DES-CBC3-SHA';
    ssl_prefer_server_ciphers on;
    ssl_dhparam /etc/ssl/certs/dhparams.pem;

    ...
}
The nginx configuration can be checked with
Any problems with the configuration will be reported. If you’ve done it right, it shows something like:
nginx: the configuration file /etc/nginx/nginx.conf syntax is ok
nginx: configuration file /etc/nginx/nginx.conf test is successful
Make sure you include all configuration files the right way, otherwise you might be troubleshooting configuration that isn’t actually active at all!
After reloading nginx, all this resulted in the following report:
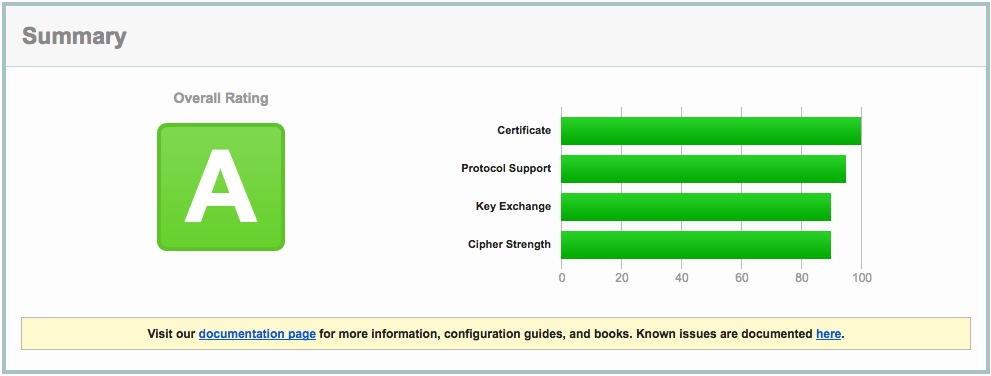
Close, but no sigar..!
A few more SSL settings need to be modified in order to get the A+ rating. So, I edited the nginx config again:
server {
    listen 443 ssl default_server;
    listen       [::]:443 ssl http2 default_server;

    ...

    ssl_certificate ""/etc/..../fullchain.pem"";
    ssl_certificate_key ""/etc/..../privkey.pem"";

    ssl_protocols TLSv1 TLSv1.1 TLSv1.2;
    ssl_prefer_server_ciphers on;
    ssl_ciphers ""EECDH+AESGCM:EDH+AESGCM:AES256+EECDH:AES256+EDH"";
    ssl_ecdh_curve secp384r1;
    ssl_session_cache shared:SSL:10m;
    ssl_session_tickets off;
    ssl_stapling on;
    ssl_stapling_verify on;

    add_header Strict-Transport-Security ""max-age=63072000; includeSubdomains"";
    add_header X-Frame-Options DENY;
    add_header X-Content-Type-Options nosniff;

    ssl_dhparam /etc/ssl/certs/dhparams.pem;

    ...
}
Which resulted in A+ (yay):

A lot of information about these nginx settings can be found here: https://raymii.org/s/tutorials/Strong_SSL_Security_On_nginx.html and here: https://cipherli.st.
Mitigating TLS-FALLBACK-SCSV would be possible, if it weren’t for the openssl version on CentOS 7, which is 1.0.1e. OpenSSL 1.0.1 has TLSFALLBACKSCSV in 1.0.1j and higher though.
2016.09.20 - posted in Linux
- log in to your CentOS 7 installation
- disable firewalld
systemctl stop firewalld
systemctl mask firewalld
- install the iptables-services package
yum install iptables-services
- enable the services at boot-time
systemctl enable iptables
systemctl enable ip6tables
systemctl start iptables
systemctl start ip6tables
- save the iptables configuration
service iptables save
service ip6tables save
- the configuration can now be found in the file
/etc/sysconfig/iptables