September 12, 2017
I recently bought an Ubiquiti USG and had to ‘adopt’ it into an existing network, using a 10.0.0.0/24 subnet.
This requires the default ip address on the USG of 192.168.1.1/24 change to an ip address that can be reached on the existing network. To be more precise, the Unifi controller needs to be able to reach the USG in order to be able to adopt it.
- Connect a laptop or desktop to the USG on the LAN1 port, make sure the nic is setup to receive an ip address via DHCP
- Ping the USG to see whether it’s reachable:
ping 192.168.1.1
- SSH into the USG with the user
ubnt and the password ubnt
- Issue the commands below to change the ip address of the USG:
configure
set interfaces ethernet eth1 address 10.0.0.1/24
delete interfaces ethernet eth1 address 192.168.1.1/24
commit
save
- The SSH session wil drop and you can connect the USG to the existing network.
August 15, 2017
I was still using KeePassX 0.4.4 on my Mac. This version doesn’t support the Retina display on my Mac, but it wasn’t annoying enough to upgrade/migrate. One of my colleagues mentioned KeePassXC (https://keepassxc.org/), so I decided to give it a test drive.
Be sure to download the digest file as well and compare the digest against:
cat KeePassXC-2.2.0.dmg.DIGEST && shasum -a 256 KeePassXC-2.2.0.dmg
The result should be the same:
d5dec4a01b0fa00f36ebbd8d001ad24a1559d7f897af3d9a2fbdb339b02086bc  KeePassXC-2.2.0.dmg
d5dec4a01b0fa00f36ebbd8d001ad24a1559d7f897af3d9a2fbdb339b02086bc  KeePassXC-2.2.0.dmg
January 28, 2017
Today I wanted to properly set up DNS forwarding on my Ubquiti EdgeRouter X. More specifically, I wanted to use the OpenDNS FamilyShield DNS servers:
208.67.222.123
208.67.220.123
This means that you if you want to use other nameservers, you should substitute those IP addresses for the ones you prefer.
Setting
- Ubiquiti EdgeRouter X (EdgeOS 1.9.0)
- eth0 is the WAN port
- WAN IP is obtained via DHCP
- LAN DHCP settings are already in place (DNS points to the LAN gateway IP and DNS listening on the interface is configured)
Steps
First, we enter configuration mode and delete existing nameservers:
configure
delete system name-server
Then, we set the system nameservers (note that these will be used by the system, not for forwarding):
set system name-server 208.67.222.123
set system name-server 208.67.220.123
If the WAN IP adres is obtained via DHCP, you need to tell the router not to update the nameserver configuration:
set interfaces ethernet eth0 dhcp-options name-server no-update
Finally, here”s the most important part:
set service dns forwarding name-server 208.67.222.123
set service dns forwarding name-server 208.67.220.123
The round-up is as follows:
commit
save
exit
release dhcp interface eth0
renew dhcp interface eth0
The last 2 statements make sure that the provider IP settings are being refreshed. On my device, it took some time for the settings to take effect.
Verification
There are multiple ways to verify the setup.
1. Check the configuration
You can check the setup on the router with this statement:
show dns forwarding nameservers
The output should be something like:
-----------------------------------------------
   Nameservers configured for DNS forwarding
-----------------------------------------------
208.67.222.123 available via ''statically configured''
208.67.220.123 available via ''statically configured''
2. Surf for some inappropriate content
When surfing for some inappropriate content, the result should be:
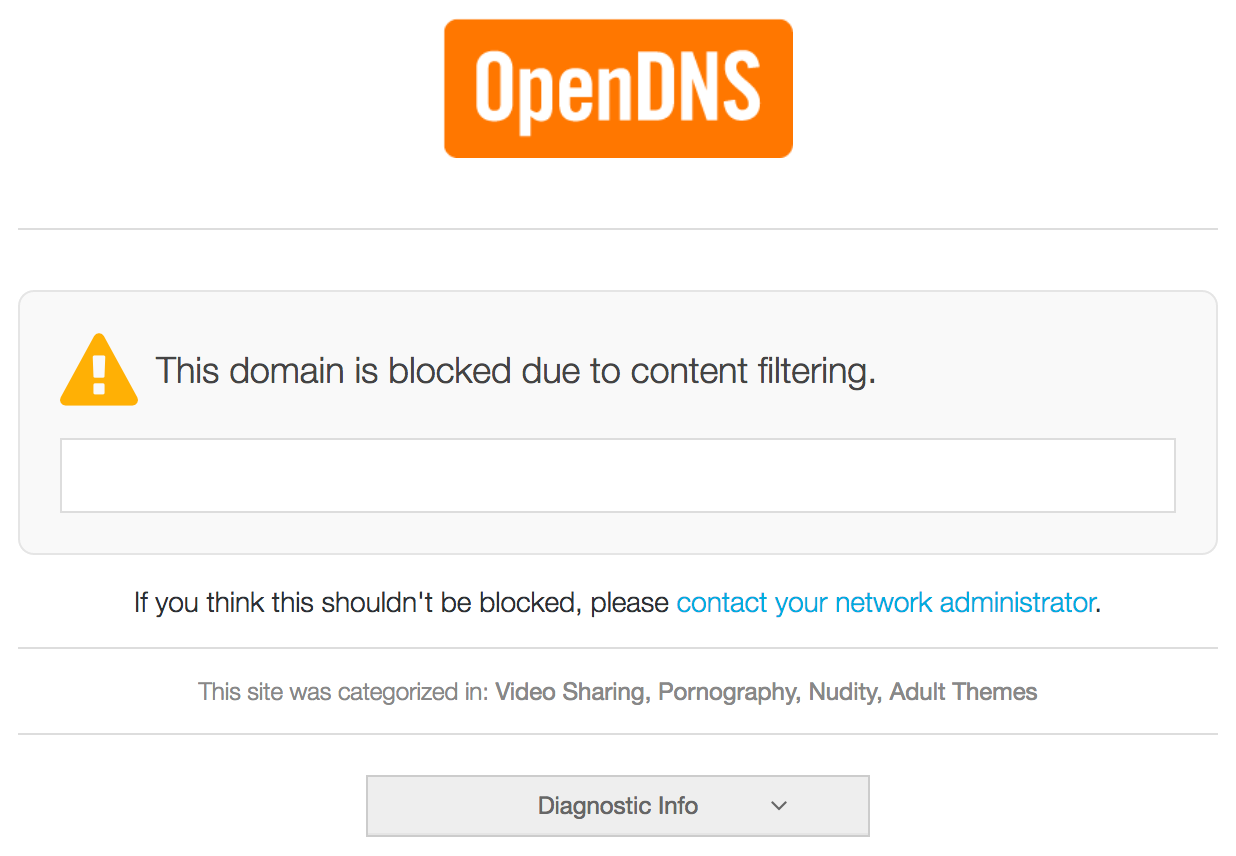
Mission accomplished :)
January 28, 2017
To secure your Ubiquiti user account, you can add your ssh key to the account.
Assuming your on Linux or macOS, these are the steps (make sure you use the IP address of your EdgeRouter):
On your system
cd ~/.ssh
scp ~/.ssh/id_rsa.pub 192.168.1.1:/tmp
On your EdgeRouter
configure
loadkey admin /home/admin/id_rsa.pub
commit
save
exit
Unfortunately, this gave me:
Not a valid key file format (see man sshd) at /opt/vyatta/sbin/vyatta-load-user-key.pl line 96, <$in> line 1.
The solution is to take the key part out of your id_rsa.pub file en specify the key and the key type both in the configuration tree.
configure
set system login user admin authentication public-keys user@host key ***KEY-BODY-HERE***
set system login user admin authentication public-keys user@host type ssh-rsa
set service ssh disable-password-authentication
commit
save
exit
January 14, 2017
Should you ever need a tftp server on your macOS device, you can use the builtin tftp server:
sudo launchctl load -F /System/Library/LaunchDaemons/tftp.plist
sudo launchctl start com.apple.tftpd
The tftp root folder is /private/tftproot
The file /System/Library/LaunchDaemons/tftp.plist holds the configuration.
Stopping the tftp server is as easy as:
sudo launchctl unload -F /System/Library/LaunchDaemons/tftp.plist
‘Tested and approved’ on macOS Sierra